Lesson 1 3 min
What is MyAiBusiness
What you will achieve
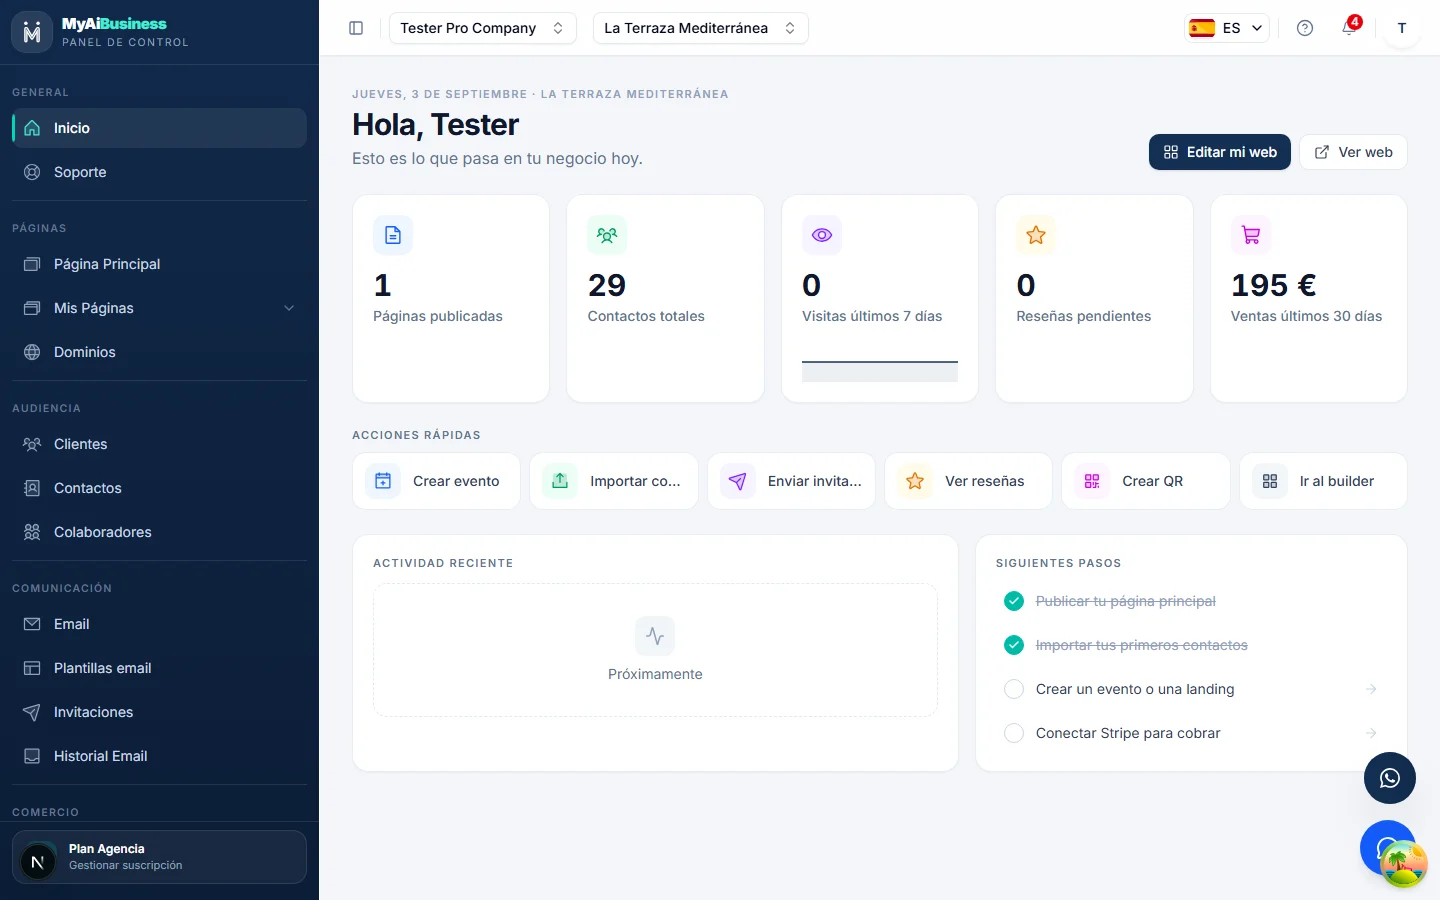
Understand in two minutes what you can build: website, events, landing pages, store and customers in one place.
- 1
User guide
From creating your account to collecting your first order. Six chapters, seventeen short lessons, no technical skills needed. Every lesson ends with something you can see.
Chapter A
Your website live on day one.
Lesson 1 3 min
What you will achieve
Understand in two minutes what you can build: website, events, landing pages, store and customers in one place.
Open the public website of a business built with MyAiBusiness.
It is a main page with its own domain, blocks and gallery. Everything you see is edited without code.
Go to an event page and find the confirm-attendance button.
Events collect confirmations and control access with a QR code.
Open a campaign landing page and look at the form.
Landing pages capture contacts: every submission reaches your dashboard.
Visit the store and add a product to the cart.
The store takes payment by WhatsApp, email or card.
Back in the dashboard, Home shows the business metrics.
Everything is managed from here. In the next lesson you create your account.
How you know it worked
You know what each section of the dashboard is for, and where to begin.
Lesson 2 5 min
What you will achieve
Sign up, verify your email and create your first business.
Before you start
An email address you can access. No card needed.
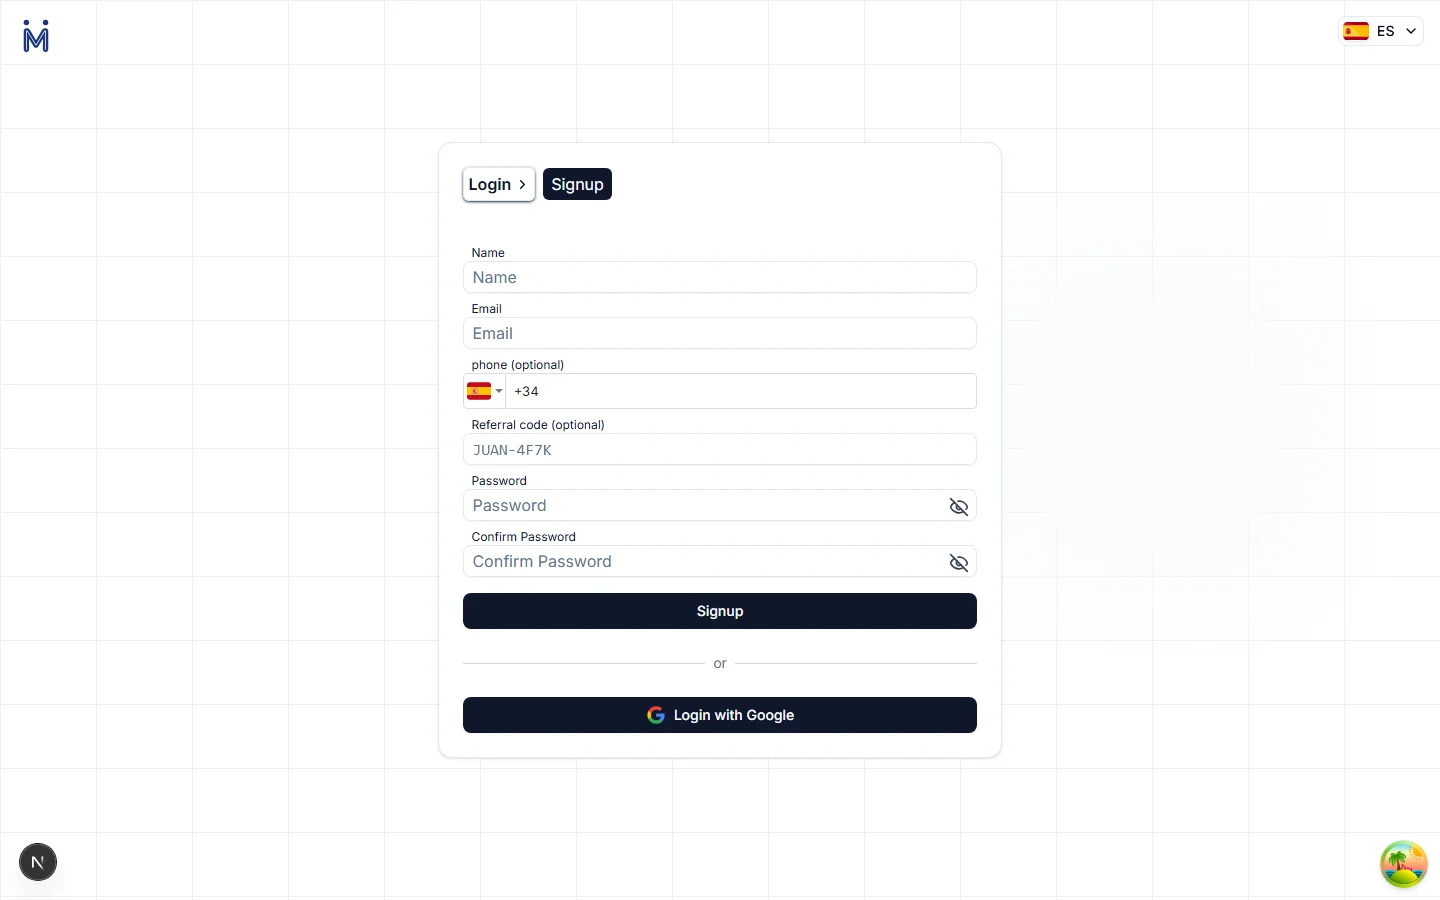
On the home page click “Start for free”.
You can sign up with email and password, or with your Google account.
Fill in name, email and password and submit the form.
You will see the “Check your email” screen.
Open the verification email and click the link.
If you open it on your phone, the browser where you signed up logs in by itself: no need to type the password again.
Type the name of your business.
The web address is generated from the name and warns you if it already exists.
Add contact email, phone and address, then save.
These details appear in your website footer and in the emails you send.
Walk through the left menu without opening anything.
Pages, Customers, Email, Commerce, Analytics and Settings. We will cover them chapter by chapter.
How you know it worked
You are inside your business dashboard, still empty.
Tip: One account can hold several businesses. Plan limits (events, products, storage) are shared among all of them.
Lesson 3 8 min
What you will achieve
Create your business main page with the wizard and publish it.
Before you start
A PNG logo and 4 to 8 photos of your business. Upload them large: they are optimised automatically.
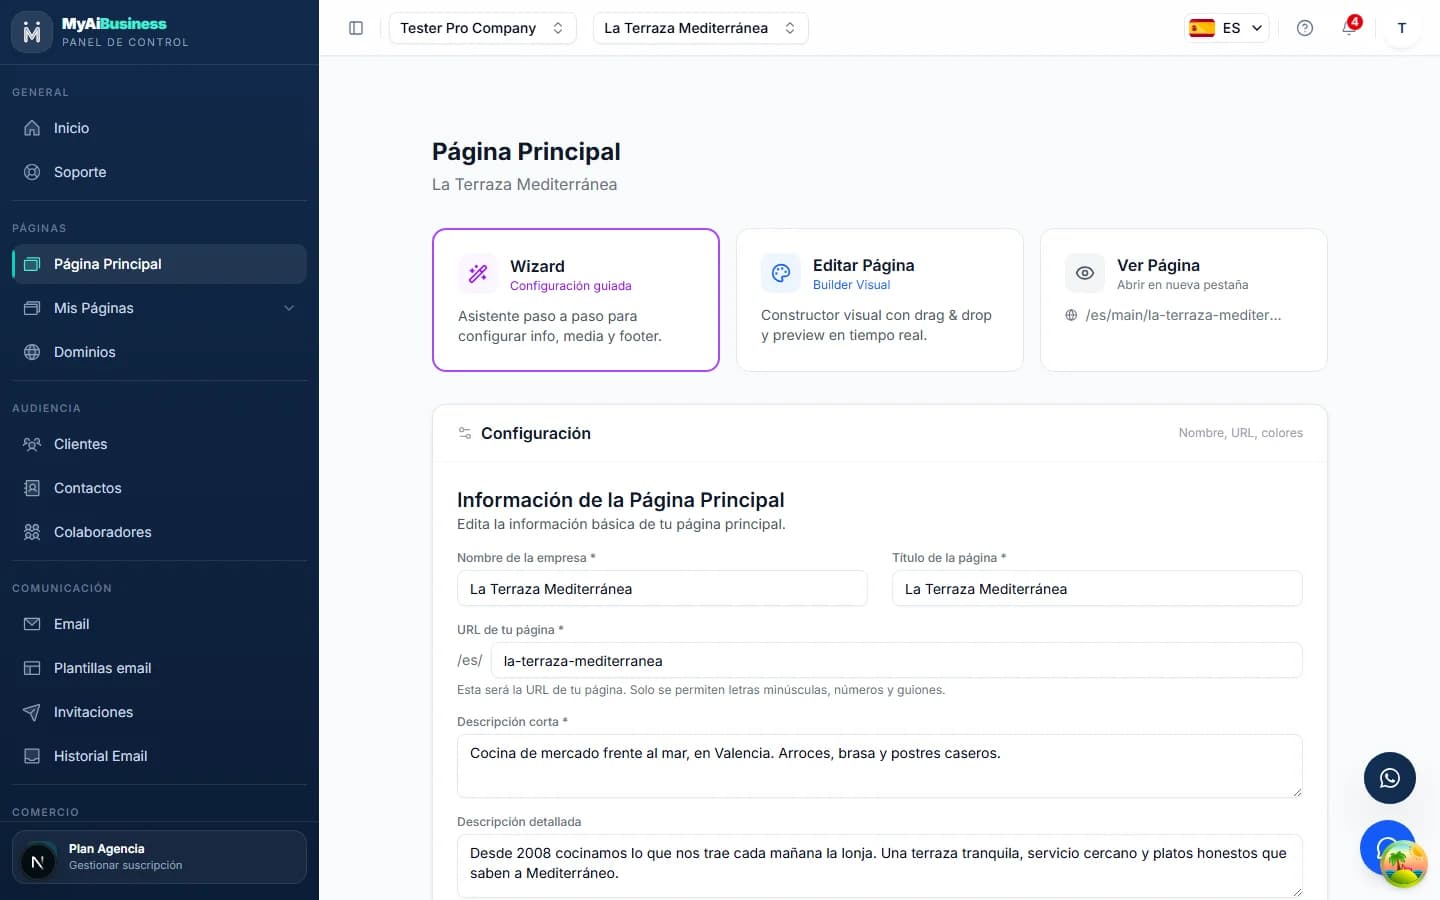
In the menu open “Main page” and click “Create”.
There can be only one main page per business: it is your website.
Step 1: type the name, a short description and pick your two brand colours.
Colours apply to the whole site. You can change them later from Styles.
Step 2: upload the logo, the cover image and the gallery.
The cover is the first screen visitors see. Choose a sharp, horizontal photo.
Turn on “Show events” if you will organise events.
It adds a carousel of your upcoming events that updates itself.
Step 3: complete the footer: social links, opening hours and legal texts.
Legal texts are generated from a template you can edit.
Click “Publish” and open your site with the “View page” button.
From that moment it is public at your address. Any change you save is visible instantly.
How you know it worked
Your website is published and open in a new tab, at your address.
Tip: If something does not convince you, do not fix it in the wizard: in chapter B you will meet the editor, where everything is changed block by block.
Chapter B
Master the Builder and Gaston, your AI copilot.
Lesson 4 7 min
What you will achieve
Edit content, add, move and hide blocks. Everything saves itself.
Before you start
Your main website published (end of lesson 3).
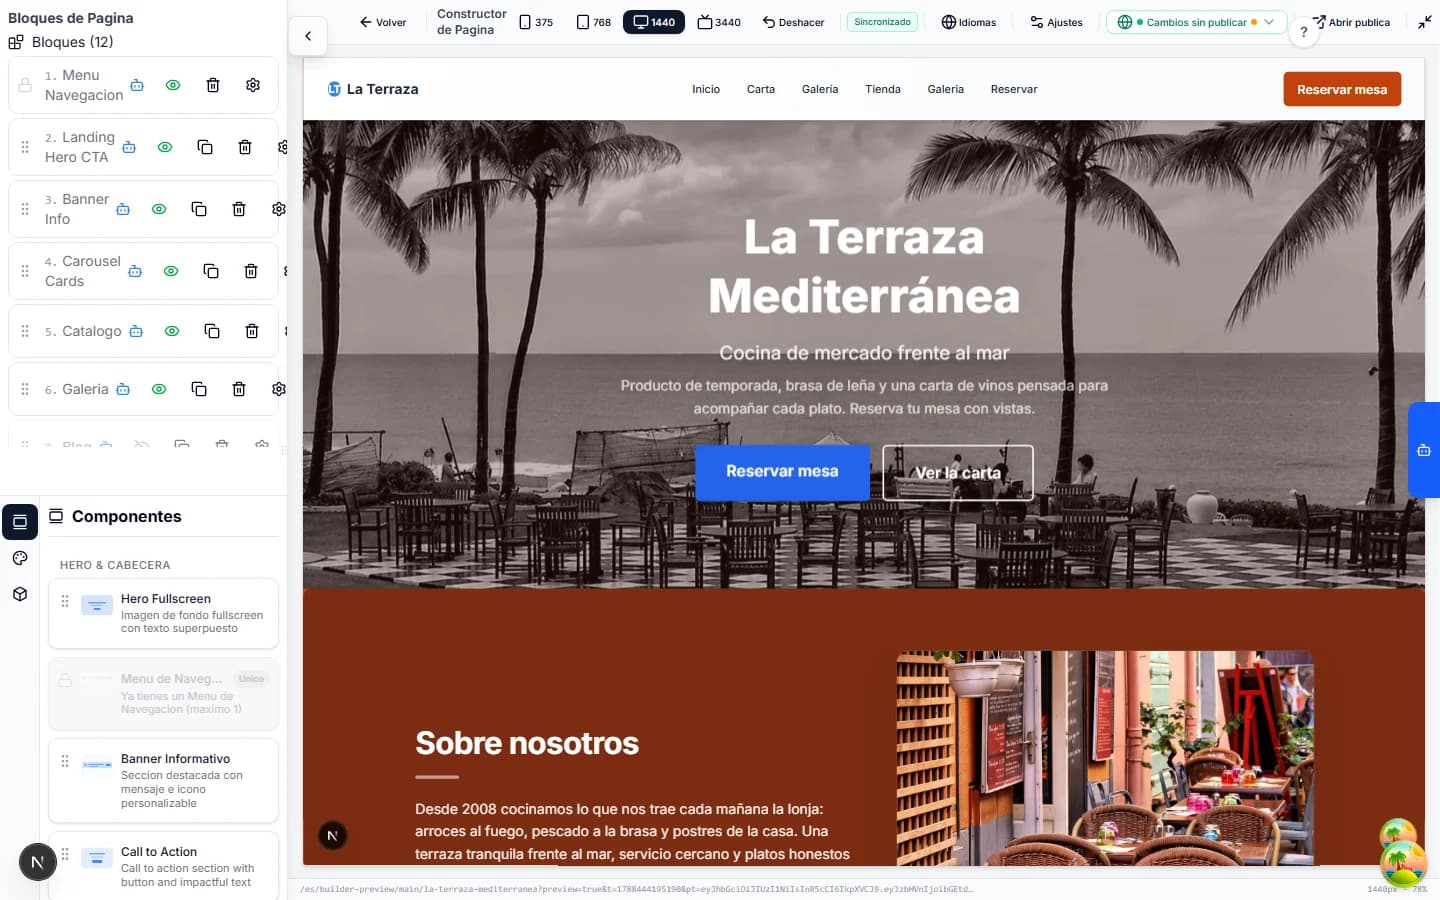
In “Main page” click the “Edit page” card.
The Page Builder opens: your site’s block list on the left, the live preview in the centre.
Click the gear of a block (for example “Landing Hero CTA”) and change the title.
There is no save button: “Synced” appears at the top as soon as the change is stored.
In that same editor replace the image with one from your computer.
It is converted and optimised automatically in three sizes; upload it large.
Drag a block by its handle (the six dots) to move it.
The preview reorders instantly.
Click a block’s eye icon to hide it without deleting it.
Hidden blocks do not show on the public site but stay in your list for when you want them back.
Bottom left, in “Components”, drag “Call to Action” into the block list.
New blocks are born hidden. Fill in the text and button, then click its eye to publish it.
Test the site at the 375, 768 and 1440 sizes in the top bar and click “Open public”.
The sizes are phone, tablet and desktop. The status dropdown warns you if changes are still unpublished.
How you know it worked
A new Call to Action block published on your site.
Tip: “Undo” (Ctrl+Z) reverts the last change. Unique blocks, such as the navigation menu, appear locked in the palette: there can be only one.
Lesson 5 4 min
What you will achieve
Change the visual identity of the whole site from one place.
Before you start
End of lesson 4.
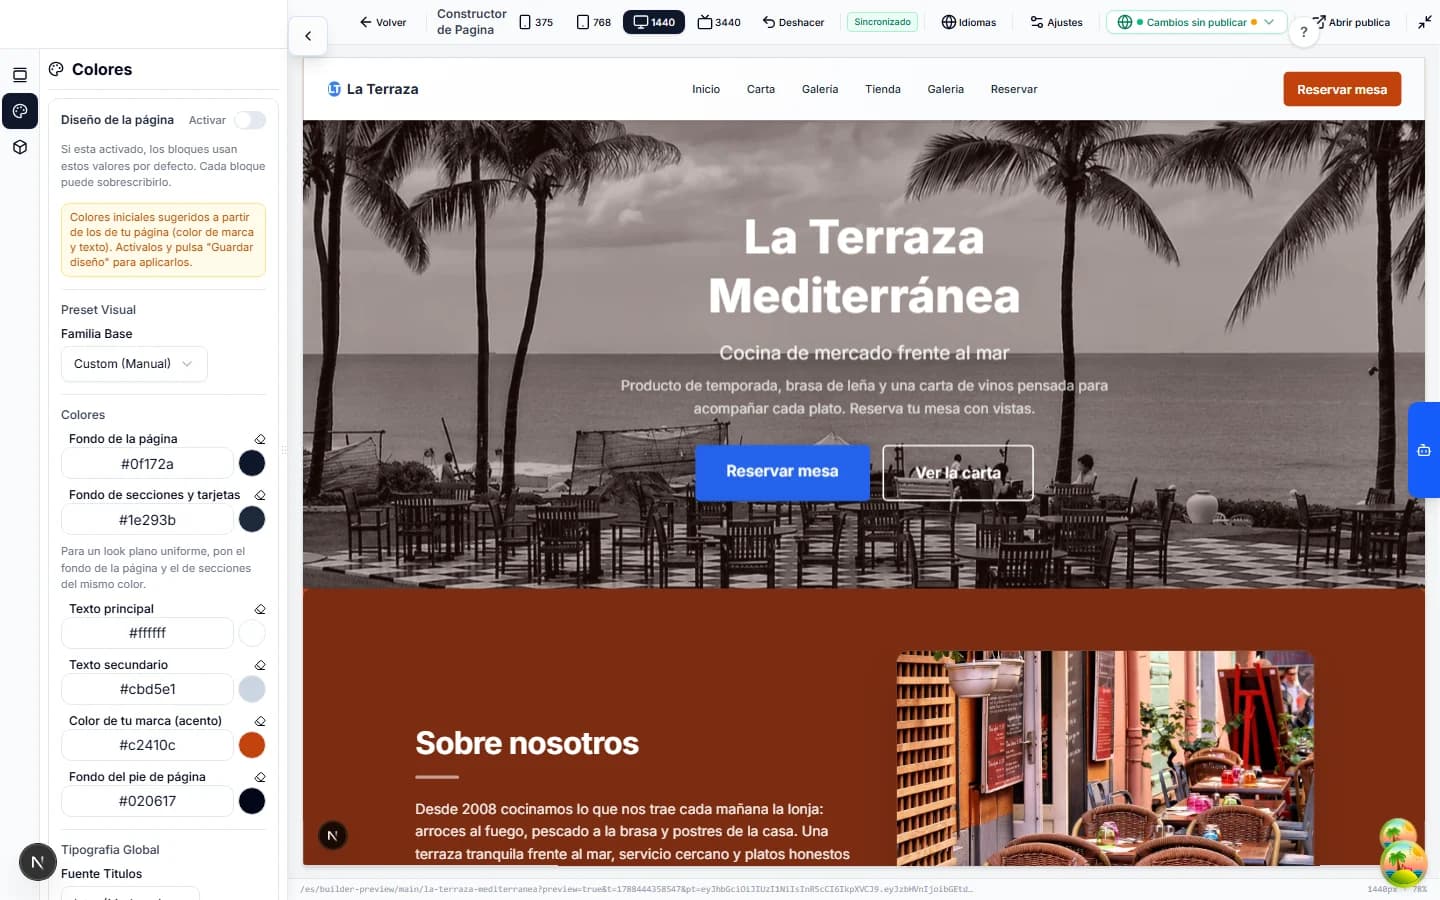
In the Builder click the “Colours” palette icon in the left bar.
You will see colours suggested from your brand colours.
Turn on the “Page design” switch.
While on, every block uses these values by default. Each block can override them later.
Lesson 6 8 min
What you will achieve
Build and modify the page by chat, generate text and images.
Before you start
Site published. Have three requests written down so you do not improvise.
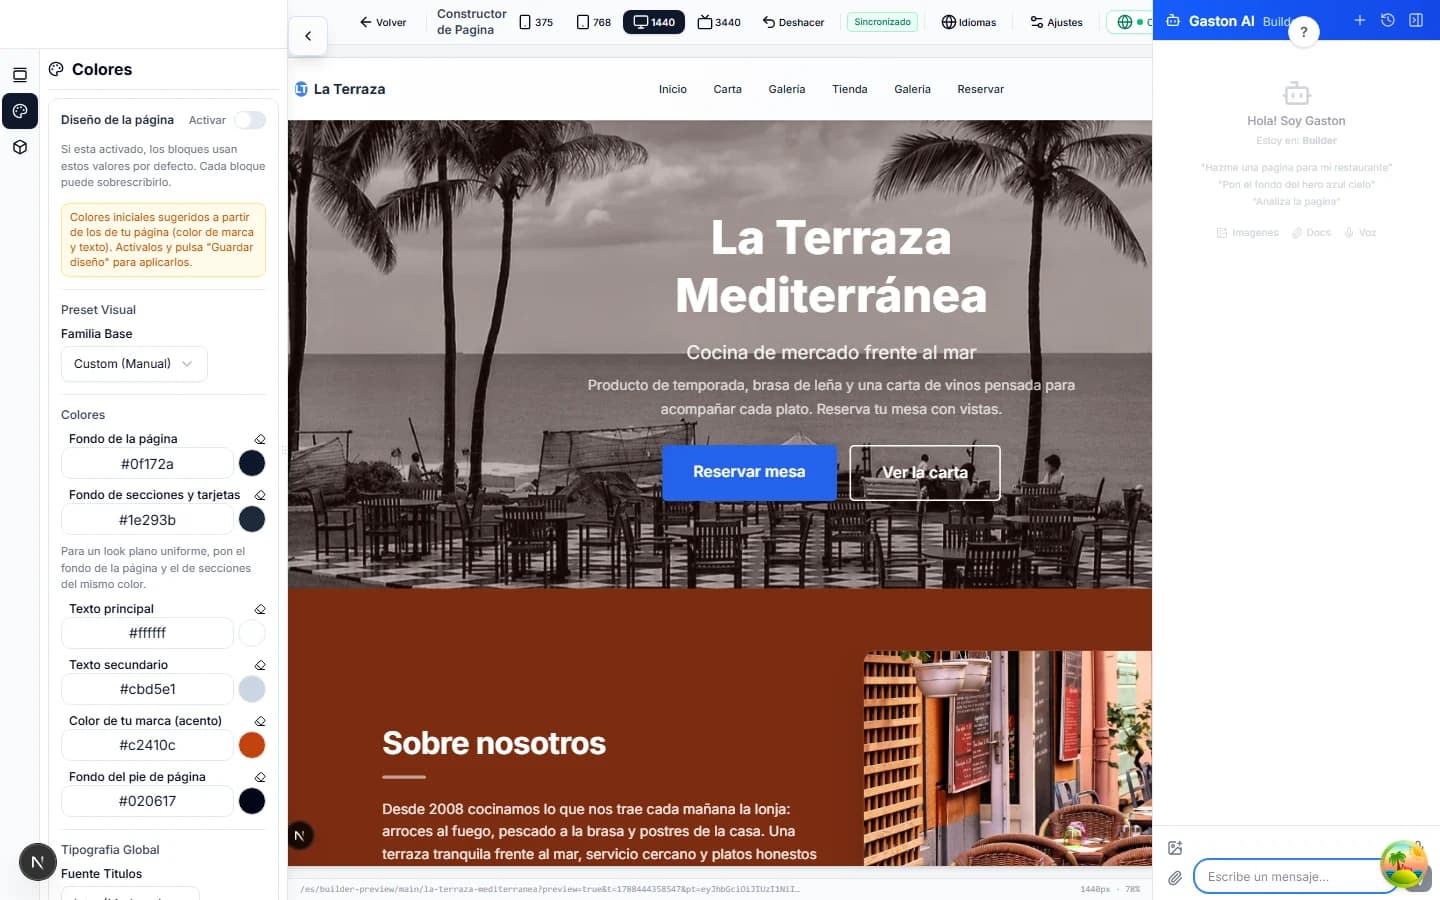
In the Builder click “Open Gaston AI”, top right.
A chat panel opens with examples: “Build a page for my restaurant”, “Make the hero background sky blue”, “Analyse the page”.
Type a specific request and send it: “Add a testimonials section with three customer quotes”.
Gaston creates the block, the preview updates live and it tells you what it did.
Chapter C
Turn your website into lead generation.
Lesson 7 8 min
What you will achieve
Use the event wizard: details, dates, access type, images and map, then publish.
Before you start
Website published. A cover image for the event and the venue address.
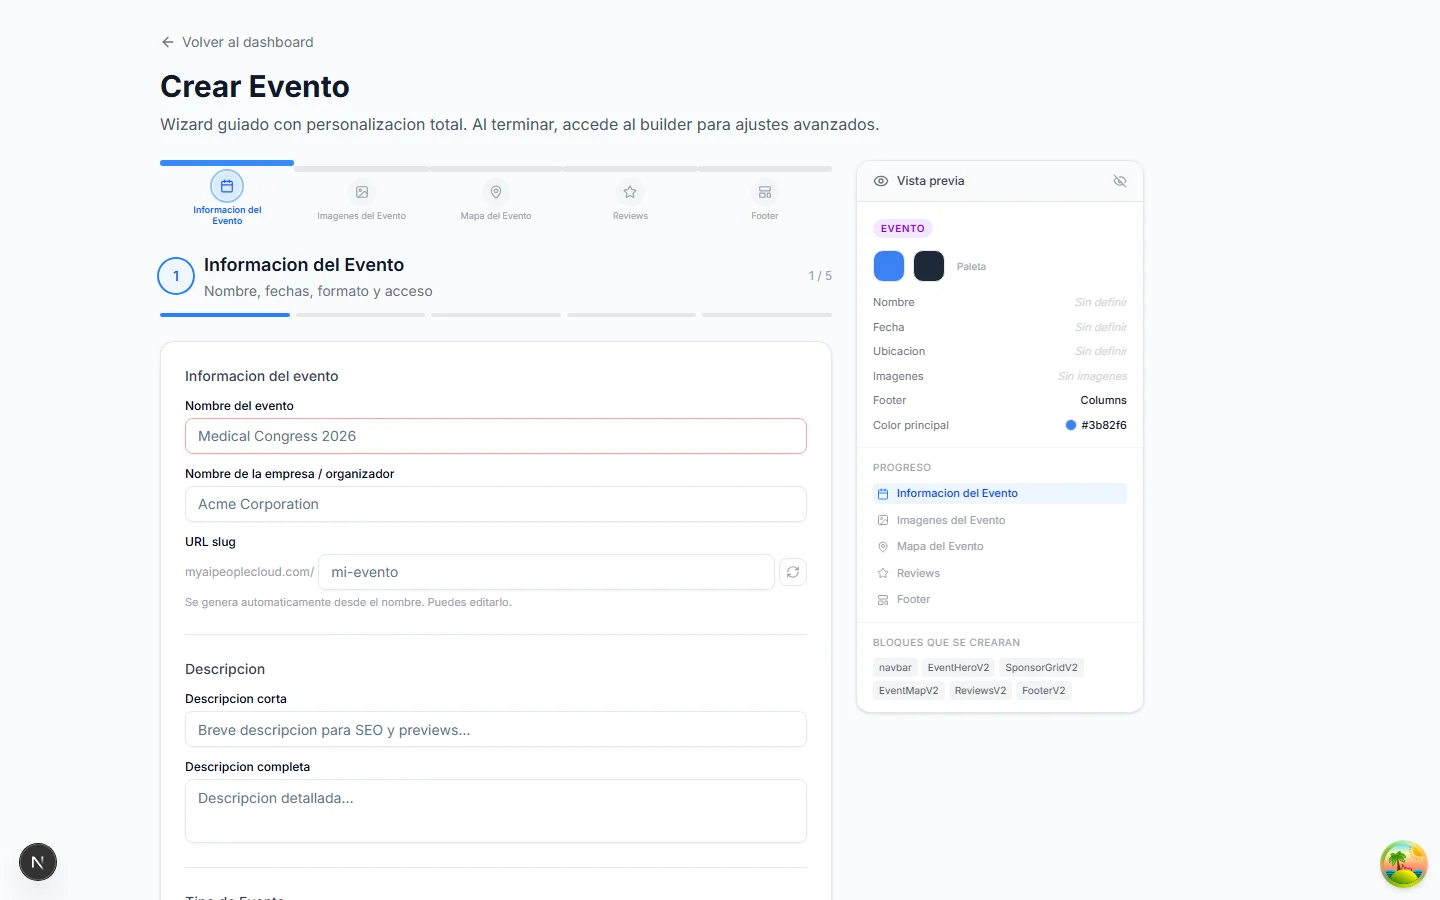
In the menu, under “My pages”, click “New event”.
The “Create event” wizard opens in five steps: Information, Images, Map, Reviews and Footer. On the right, a preview fills itself in.
Type the event name and the organiser; the URL is generated automatically.
You can edit the URL before publishing. Afterwards, better leave it: it is the one you will share.
Add the short and full descriptions and pick the type (conference, workshop, concert…).
The short description shows in search engines and when the link is shared.
Keep “Public”, choose the brand colours and, under “Event details”, set start and end dates, format (in person, online or hybrid) and “Confirmations (RSVP)” as access type.
With confirmations, people reserve a free seat. “Tickets” is for selling entries (see chapter D).
Click “Next”: upload the cover image and, if you like, more photos.
They are optimised automatically.
In “Map”, type the address and confirm the pin on the map.
Attendees will see how to get there from the event page.
Complete Reviews and Footer with “Next” and click “Publish”. Open the event page with the external-link icon on the card.
You will see the confirm-attendance button. Anyone who uses it appears in your confirmations list.
How you know it worked
Event published with a confirm-attendance button on its public page.
Tip: The event comes with its own blocks (cover, map, reviews, footer). Everything is edited later in the Builder, like the main website.
Lesson 8 5 min
What you will achieve
Manage confirmed guests, export the list and mark who has arrived.
Before you start
An event with three or four confirmations. Make them yourself from the public page if needed.
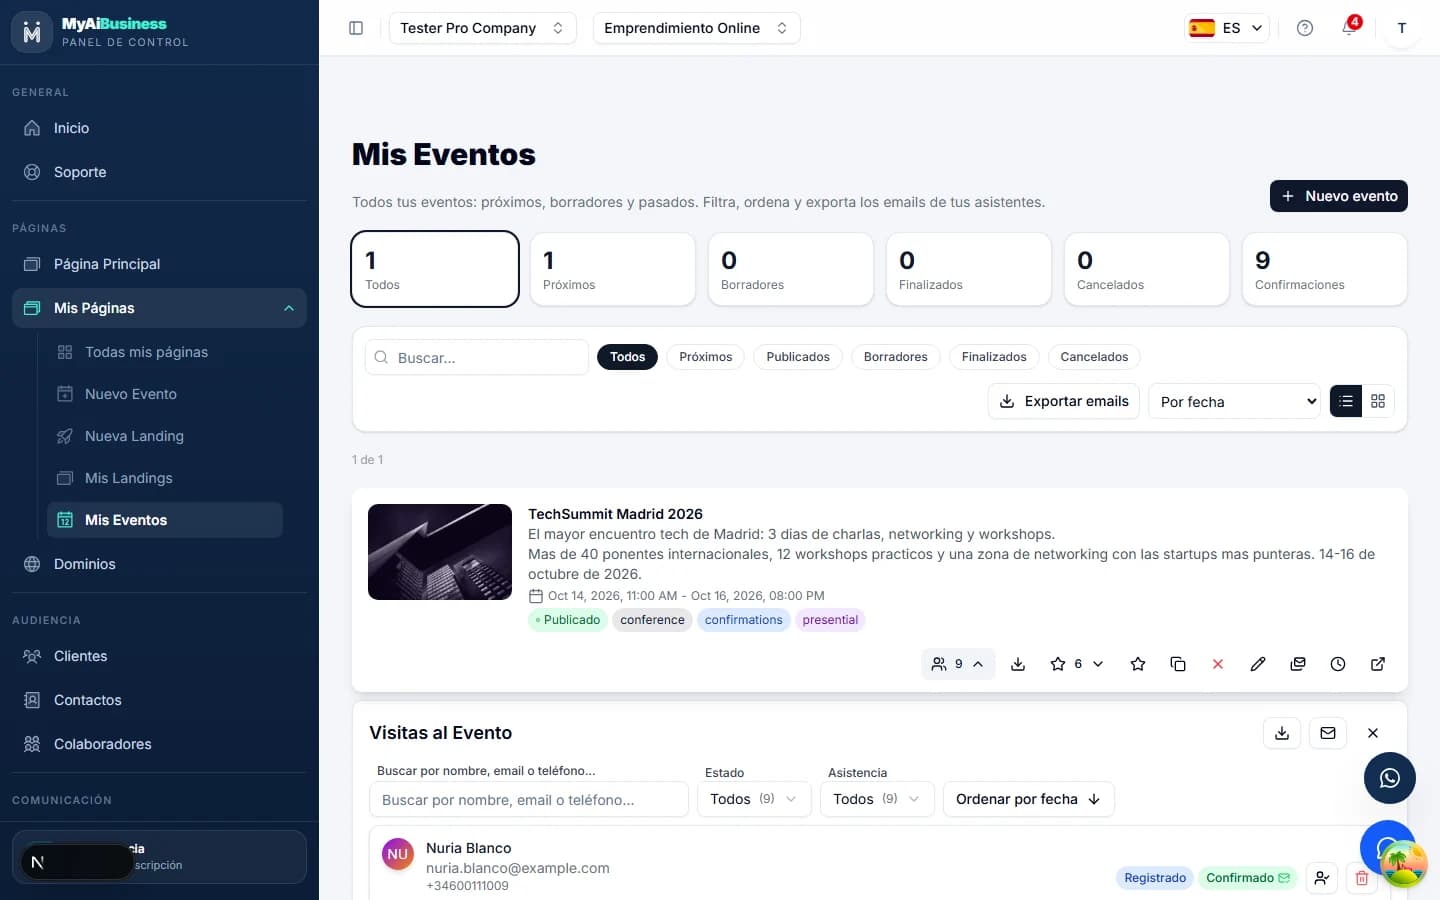
Go to “My events”. On the event card, click the number next to the people icon.
“Event visits” unfolds: every confirmation with its status (confirmed or pending) and companions.
Use the search box to find someone by name, email or phone.
With many attendees, this is the fastest at the door.
Lesson 9 6 min
What you will achieve
Create a landing page with a call to action and a form that captures contacts.
Before you start
Website published. An offer text and a cover image.
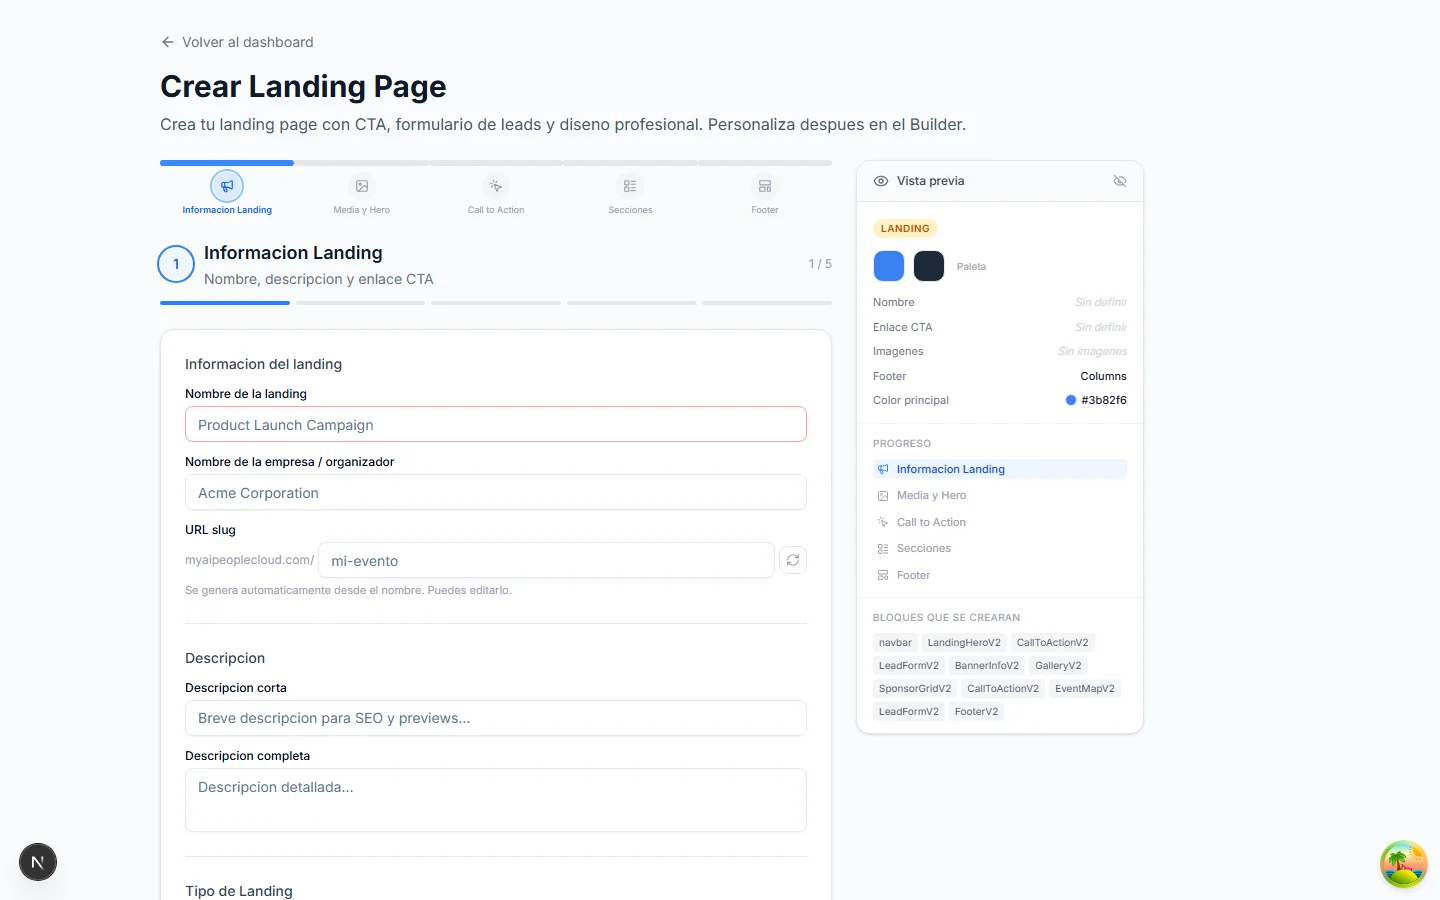
In “My pages”, click “New landing”.
“Create landing page” wizard in five steps: Information, Media and hero, Call to action, Sections and Footer.
Type name, organiser and descriptions, and pick the type: product, service, app, SaaS, single event or other.
The type only changes the starting point; you edit whatever you want afterwards.
Chapter D
Store, payments and orders.
Lesson 10 7 min
What you will achieve
Create products and show the catalogue with a cart on your site.
Before you start
Website published. Name, price and a photo for four products.
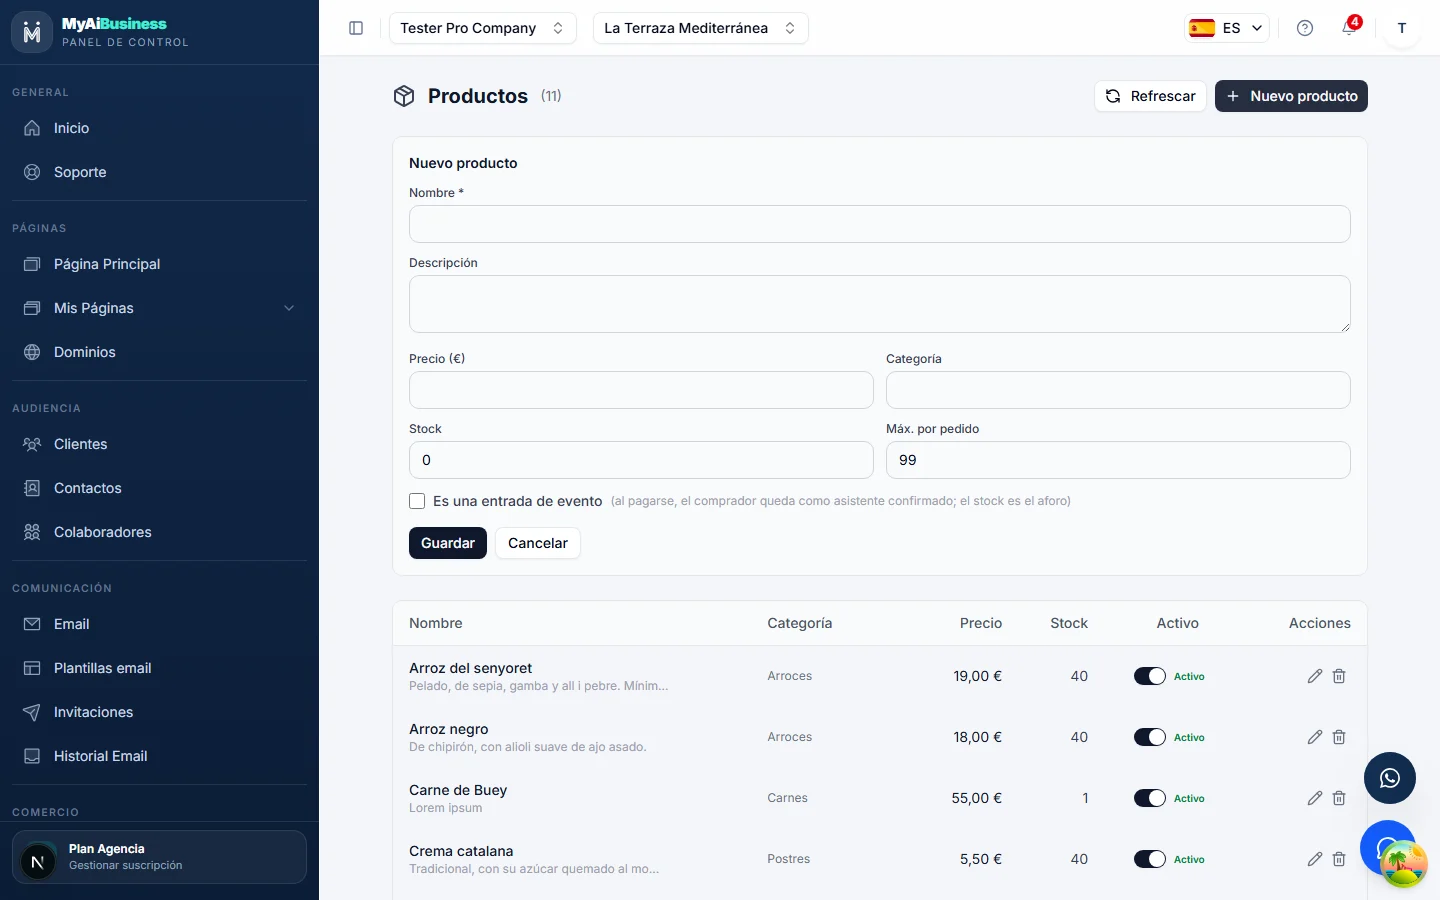
In the menu, under “Commerce”, open “Products” and click “New product”.
The table shows name, category, price, stock, active and actions (pencil to edit, bin to delete).
Fill in name, description, price in euros, category, stock and maximum per order, then click “Save”.
The category creates the store filters. Stock 0 shows as sold out.
Repeat with three more products. Use the “Active” switch to hide one without deleting it.
An inactive product disappears from the store but keeps its data.
If you sell tickets, tick “This is an event ticket”.
When paid, the buyer becomes a confirmed attendee and the stock works as capacity.
Open your site’s Builder and, if you do not have it yet, drag “Product catalogue” from “Components”.
The block reads your product table: whatever you change in Products shows on the site.
In the block settings pick the view (grid, gallery, list or minimal), the title and whether prices are shown. Publish it with the eye.
The site menu adds “Store” by itself, with its own page and a detail page per product.
Open your public site, go to “Store”, filter by category and add a product to the cart.
The cart floats bottom right and keeps the selection even if the customer changes page.
How you know it worked
Your public store with four products, category filters and a cart.
Tip: You can also create and edit products from the block itself in the Builder: it is the same table.
Lesson 11 7 min
What you will achieve
Set up payment methods and taxes, place a test order and manage it.
Before you start
Store published (lesson 10). A Stripe account if you will take card payments.
Under “Commerce”, open “Payment methods”.
Until configured, card payments go through the platform’s Stripe account. Connect yours to receive them directly.
Paste your Stripe “Secret Key” (dashboard.stripe.com/apikeys) and click “Save configuration”.
The “Webhook Secret” is optional. “Apply to the whole company” shares the account with all your businesses.
Chapter E
CRM, invitations, reminders and reviews.
Lesson 12 6 min
What you will achieve
Understand the difference between contact and customer, import your address book and filter it.
Before you start
A CSV or a text list with twenty contacts: name, email and phone.
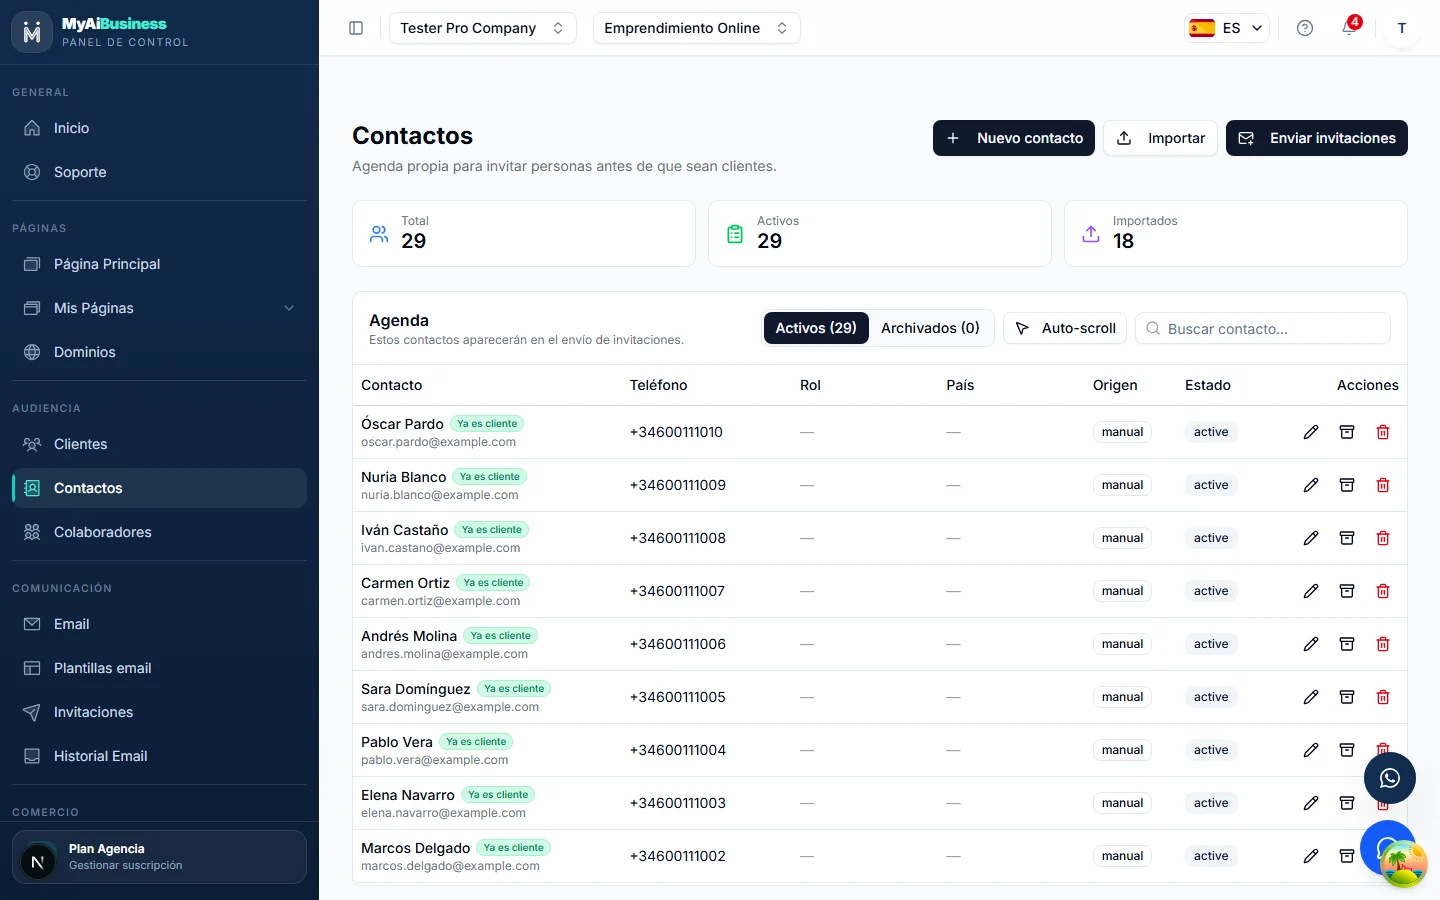
Under “Audience”, open “Contacts”.
Contacts is your commercial address book: people you want to invite even if they never visited your site. Customers is the history of those who did confirm, buy or fill in a form.
Click “Import” and choose: paste one line per contact (name, email, optional phone) or “Upload CSV”.
Duplicate emails are detected. Imported contacts get the origin “import”.
Add one by hand with “New contact”: name, email, phone, role, country, region, city and internal notes.
Role (customer, supplier, press…) and city are your criteria to segment later.
Use the search box and the Role, Country, Region, City, Origin and Status columns to find groups.
“Active” are the ones you can invite; “Archived” stay out of sends without being deleted.
On a contact, use “Edit”, “Archive” or “Delete” from the actions column.
Archive instead of deleting: you keep the history.
Open “Customers”: filter by business, event, badge, status and dates, and assign a badge to one.
Badges (VIP, for example) help you recognise customers at the door and in filters. “Hidden” takes them out of lists without deleting them.
How you know it worked
Your address book with the twenty imported contacts, filtered by role or city.
Tip: When you send invitations you can pick event attendees (customers) and address-book contacts at the same time.
Lesson 13 8 min
What you will achieve
Set up the business email, prepare a template, test it and do a bulk send.
Before you start
Address book imported (lesson 12) and a published event (lesson 7). Optional: a Resend account with its API key.
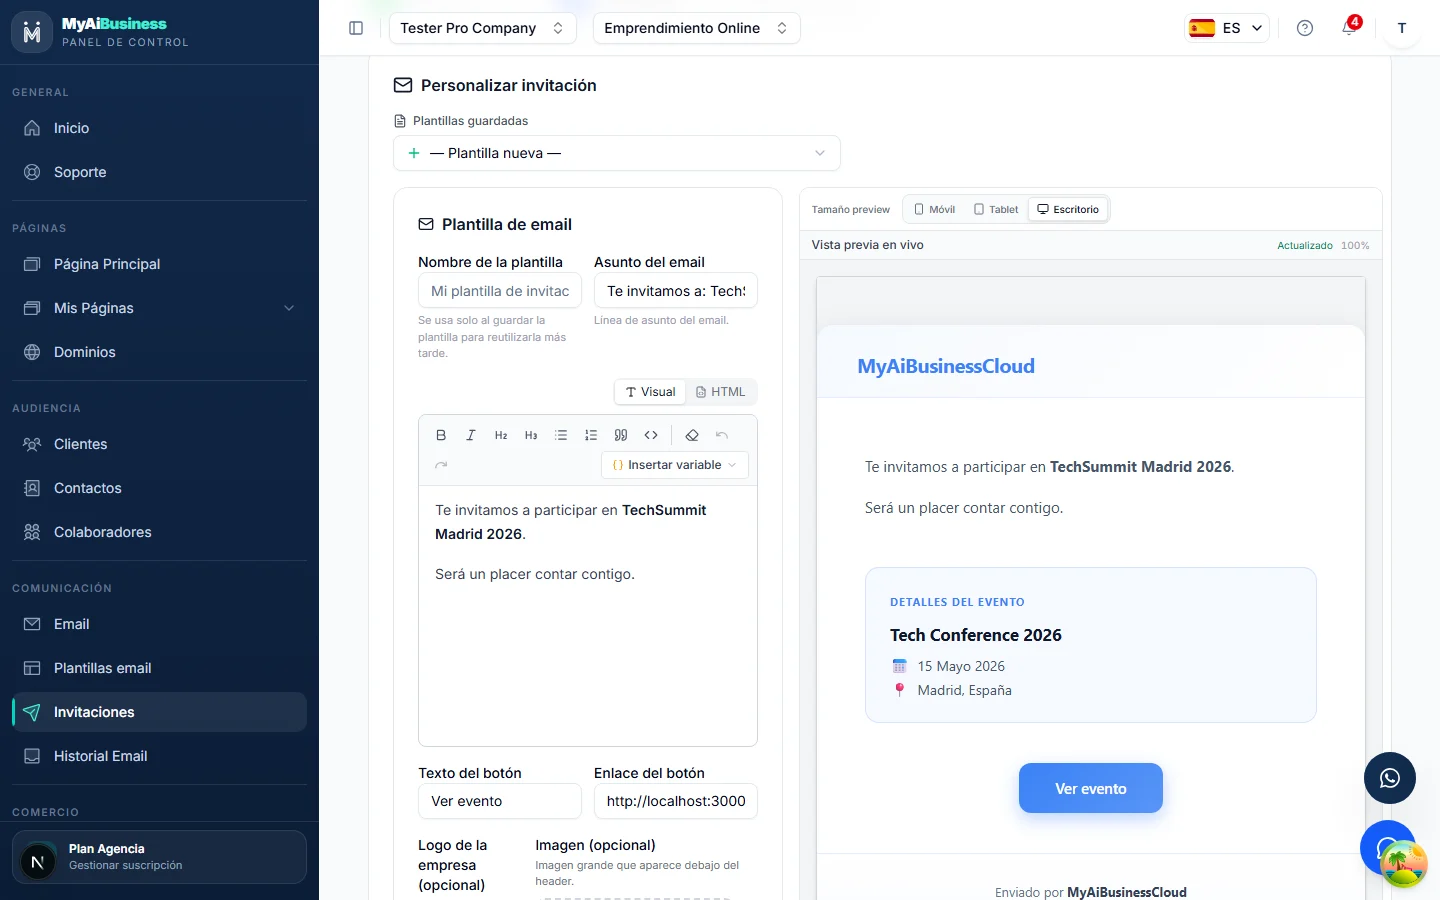
Under “Communication” → “Email”, pick the provider (Resend, recommended), type the sender email and name, paste the API key and click “Save configuration”.
Until configured, emails go out from the platform sender. “Apply to the whole company” shares it with all your businesses.
In “Email templates”, start from one of the four templates (elegant invitation, event announcement, business meeting, friendly reminder).
Edit in Visual or HTML mode. “Insert variable” adds {name}, {event}, {date} or {place}, filled in per recipient.
Lesson 14 6 min
What you will achieve
Send reminders to confirmed guests and manage your event reviews.
Before you start
Event with confirmed guests (lesson 8). Your Google or Trustpilot links at hand.
In “My events”, click the clock icon on the event card.
It opens the reminder send: the same flow as invitations, with confirmed guests preselected.
Pick the “Friendly reminder” template, adjust date and place and send a test before the real send.
The ideal reminder goes out one or two days before.
Chapter F
Languages, custom domain, plan, files and help.
Lesson 15 7 min
What you will achieve
Offer your site in more languages and connect it to your own domain.
Before you start
Website published and, for the domain, access to your registrar’s panel (where you bought the domain).
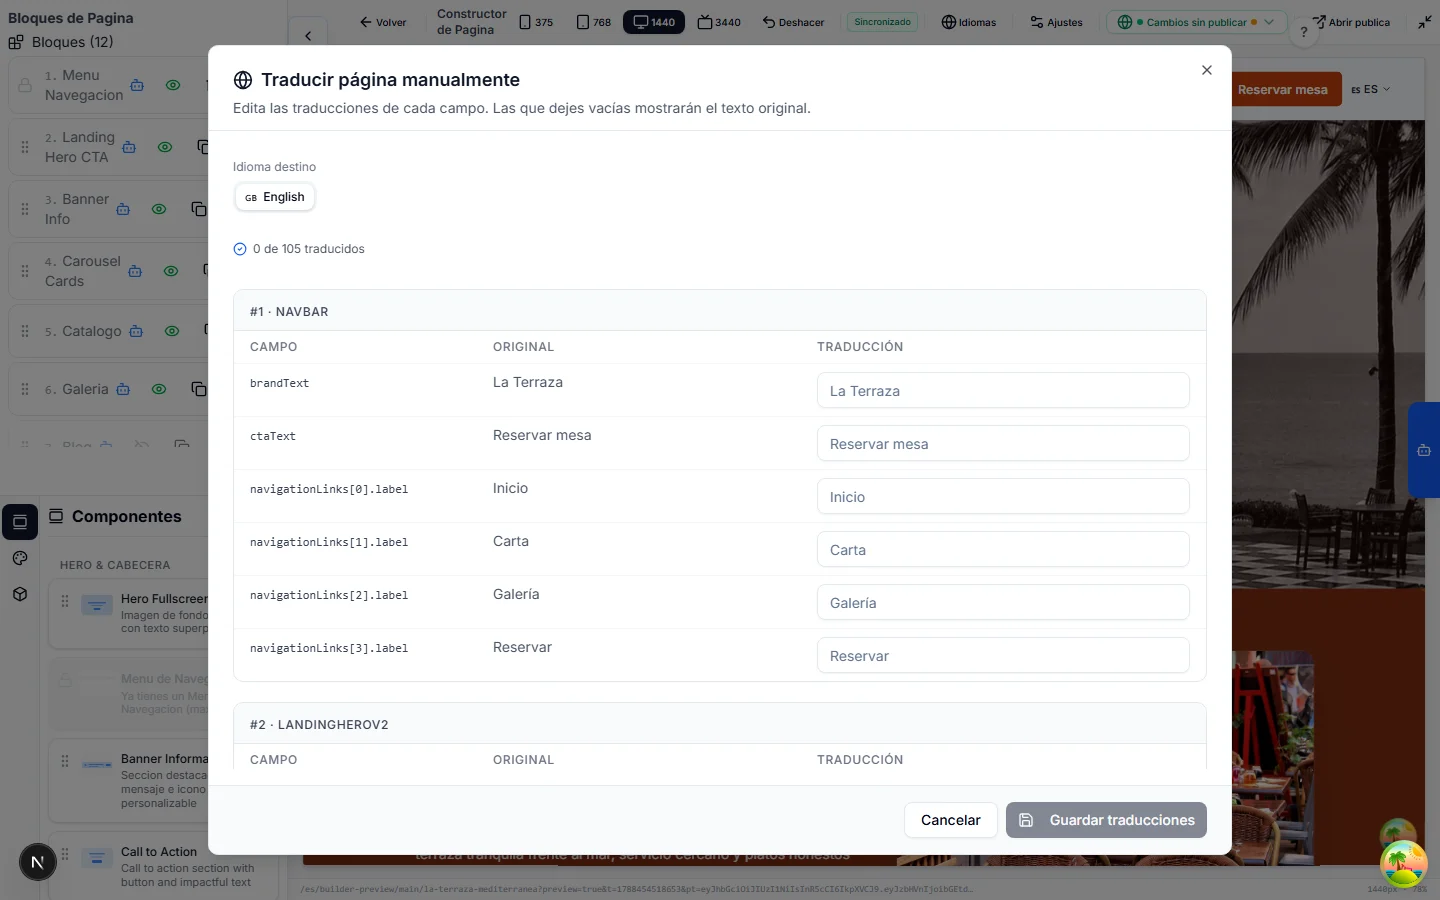
In the Builder click “Languages” in the top bar.
You will see twenty-five languages with their flags. Tick the ones you want to offer besides your own.
Tick one (English, for example) and click “Translate to 1 language”.
“Translate page manually” opens: one tab per language and a table with each field, the original text and its translation.
Type the translations field by field and save.
Empty ones show the original: the site never has gaps. Translations are yours; they are not generated automatically.
If you only want to enable languages and translate later, use “Save selection without translating”.
You can come back to this panel any time.
Open your public site: the menu shows the switcher with the enabled languages.
Visitors see their language if you enabled it; otherwise the original.
In the dashboard menu open “Domains”, pick the destination page, type your domain (for example events.yourdomain.com), the default language and click “Connect domain”.
The card tells you the exact DNS record to create.
At your registrar create that record (CNAME to cname.vercel-dns.com for a subdomain; A record to 76.76.21.21 for the root domain) and click “Verify”.
The status goes from “Pending” to “Active” once DNS propagates; it can take up to 24 hours. The HTTPS certificate is issued automatically.
How you know it worked
Language switcher on your site and domain in “Active” state.
Tip: A page can have its own domain and stay reachable at the platform address. The number of custom domains depends on your plan.
Lesson 16 4 min
What you will achieve
Understand plan limits, see what you use and free up space.
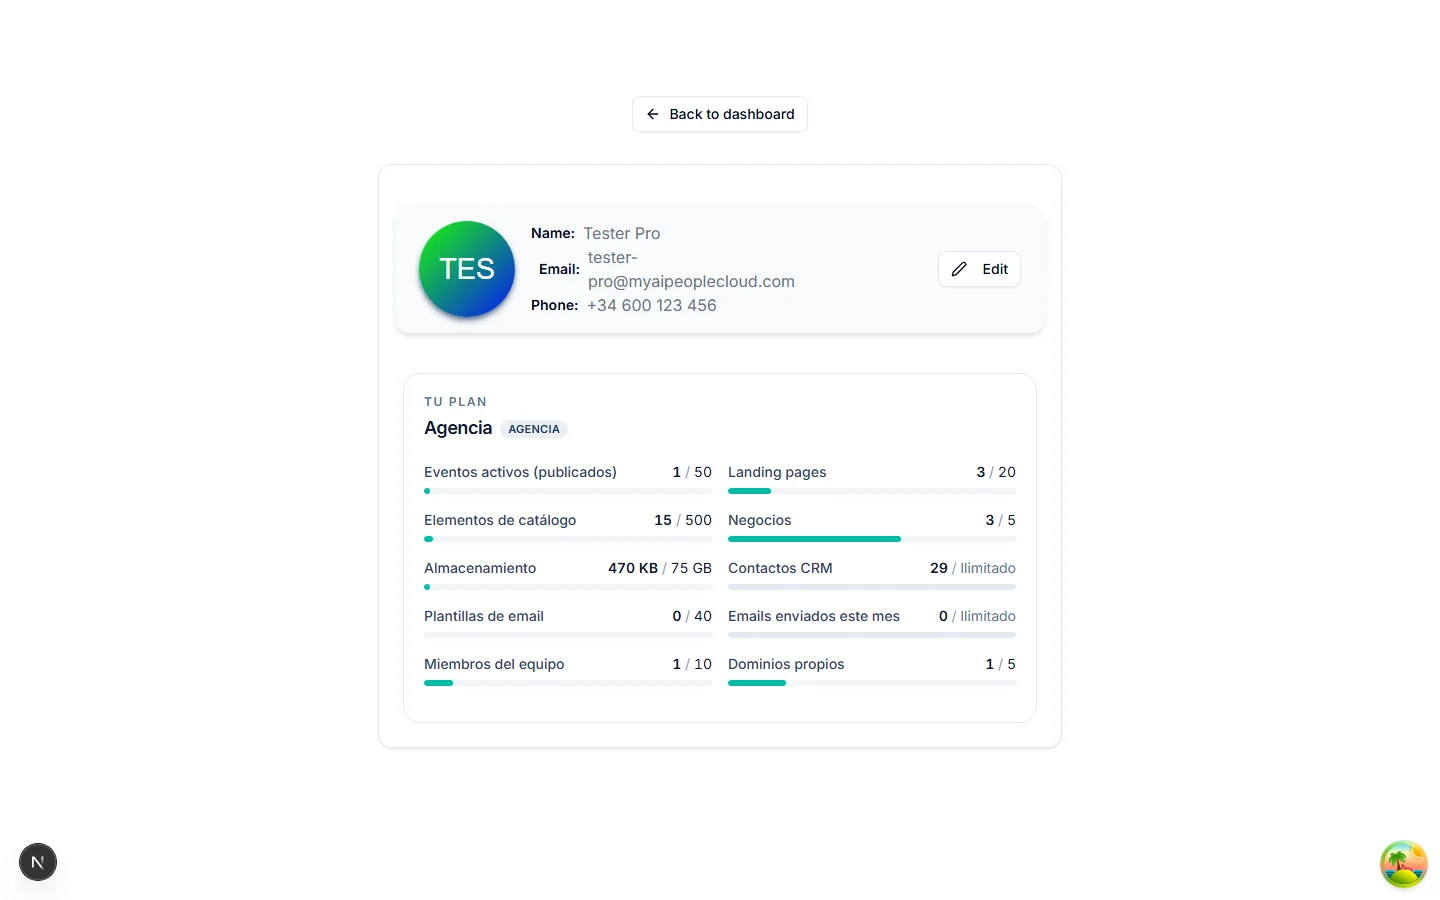
Click your avatar (top right) and open your profile, or “Manage subscription” at the bottom of the menu.
The “Your plan” card shows each counter against its limit: active events, landing pages, catalogue items, businesses, storage, contacts, email templates, team members and custom domains.
Keep in mind that limits are shared among all the businesses in your account.
If a counter hits the limit, the action is blocked with a clear notice: nothing is lost.
Under “Plan” compare Free, Basic, Business, Premium, Agency and the single-event options, and choose “Subscribe yearly” or “monthly”.
Payment is by card. Yearly is cheaper per month. If a partner referred you, enter their code.
Lesson 17 4 min
What you will achieve
Know how to contact support, what information to give and what to expect.
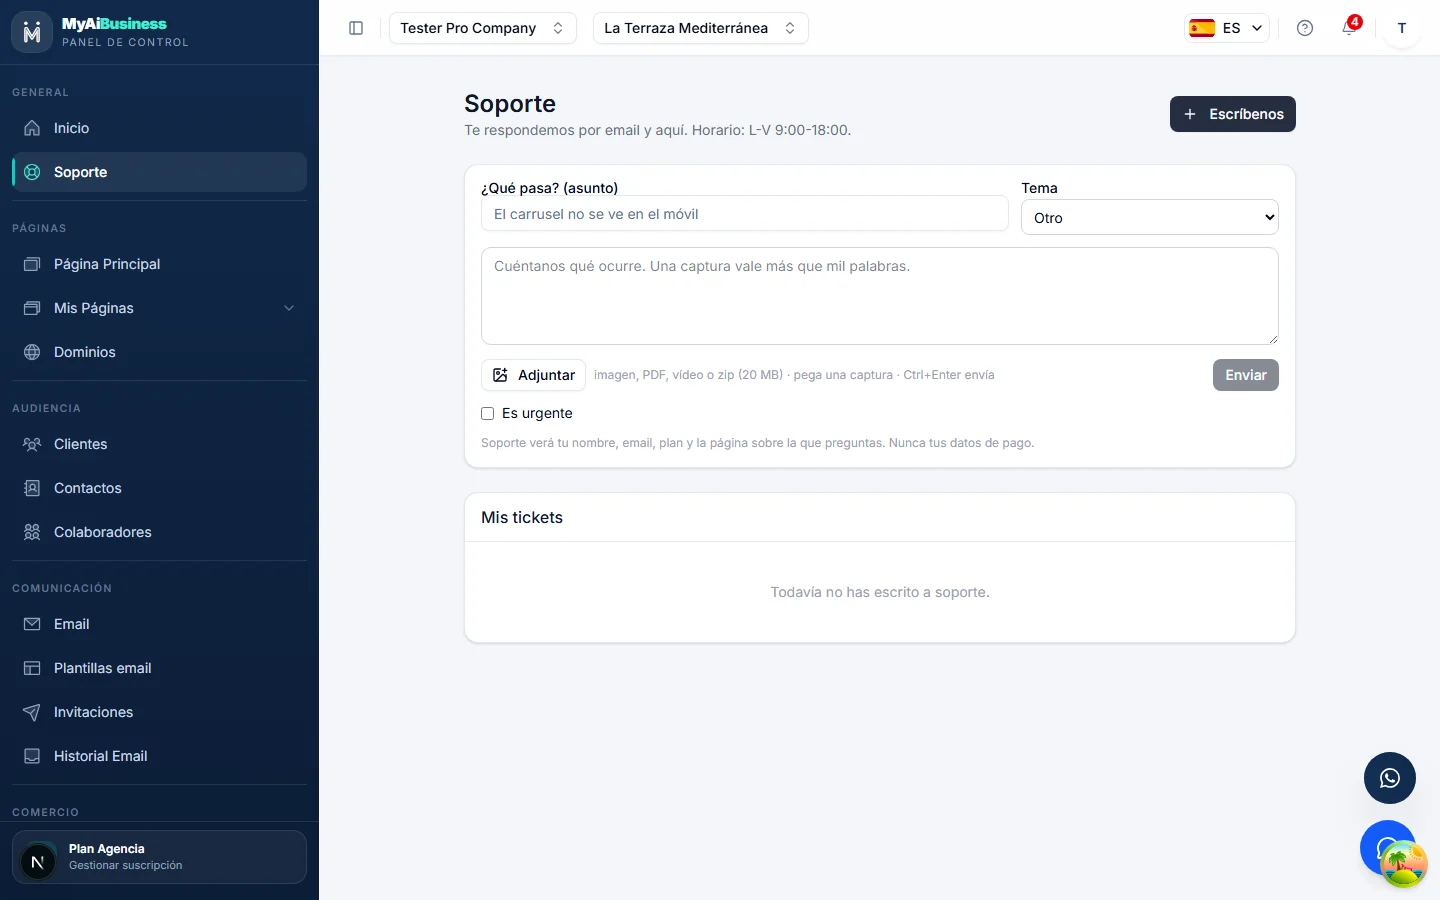
In the menu click “Support”, or the “?” button in the top bar.
We reply by email and in the dashboard itself, Monday to Friday from 9:00 to 18:00.
Click “Write to us” and fill in the subject, the topic and what is happening.
Support sees your name, email, plan and the page you ask about. Never your payment details.
Click “Attach” to add a screenshot, PDF, video or zip (up to 20 MB), or paste the screenshot directly.
A screenshot is worth a thousand words. Tick “Urgent” only if your site is down or you cannot take payments.
Creating an account is free and needs no card. Follow the guide with your own business.
In “Visual preset” pick a base family or keep “Custom” to adjust by hand.
A preset changes colours and typography at once.
Adjust the colours: page background, section background, primary and secondary text, brand colour and footer.
For a flat look, set the page background and the section background to the same colour.
Scroll down to “Global typography” and choose the heading font and the body font.
They apply to every block without a font of its own.
Click “Save design” and look at the preview.
The change shows instantly across the whole site.
How you know it worked
The same site with a different palette and font.
Ask for a change to something that already exists: “Change the hero title to … and the button to ‘Book’”.
Speak in your language and your own words: you do not need to know block names.
Generate an image: “Generate an image of a terrace at sunset for the hero background”.
The image is created, optimised and placed in the block.
Use “Images” or “Docs” to attach files, and “Voice” to dictate instead of typing.
You can hand it your menu as a PDF or some photos and ask it to use them.
If you do not like something, type “Undo the last change”.
Gaston keeps a history: you can also ask for a restore point before a big change.
How you know it worked
A new section created by Gaston with a generated image.
Tip: The more specific the request (which block, which text, which image), the better the result. One request, one change.
Filter by “Status” and “Attendance” to see who has not arrived yet.
The filters are “Confirmed / Pending” and “Attended / Did not attend”.
When someone arrives, click “Mark as attended” on their row.
You can undo it with “Mark as not attended”.
Before the event, download the list with the card’s download icon, or “Export emails” at the top.
A file with names and emails to keep a copy on paper or on your phone.
In “QR codes” → “Event QR”, generate your event’s code and download it.
Print it at the entrance: whoever scans it lands on the event page to confirm on the spot.
How you know it worked
One attendee marked as attended in the visits list.
Tip: The clock icon on the card sends a manual reminder to confirmed guests; the envelope opens invitations. Both in chapter E.
Under “Brand colours” and “Call to action”, set the colour and the link of the main button.
The link can be your WhatsApp, your store or an anchor within the landing page itself.
Upload the hero image, write the button text, choose sections and complete the footer. Publish.
Same as the event: “Next” until the end.
Open the landing page in the Builder (pencil icon) and drag “Lead form” from “Components”.
Choose the fields (name, email, phone, message) and publish it with the eye.
Open the public landing page and fill in the form yourself.
Check in “Customers” that the contact arrived. Submissions also show in “My landings” as leads.
How you know it worked
Landing page published and a new contact received in Customers.
Tip: One landing page per campaign. Change the title and button to match the ad that links to it, and compare the leads of each.
Under “Taxes”, choose the rate (VAT 21 %, VAT 10 %, IGIC 7 %, IGIC 3 % or no tax) and whether your prices already include it. Click “Save taxes”.
The breakdown shows in the cart and on the order.
In the Builder, open the Catalogue block settings and enable the payment channels: WhatsApp with your number, email and card.
They can coexist: the customer chooses how to pay at checkout.
Place a test order from your public store.
With Stripe in test mode use card 4242 4242 4242 4242. Via WhatsApp or email the order arrives as pending.
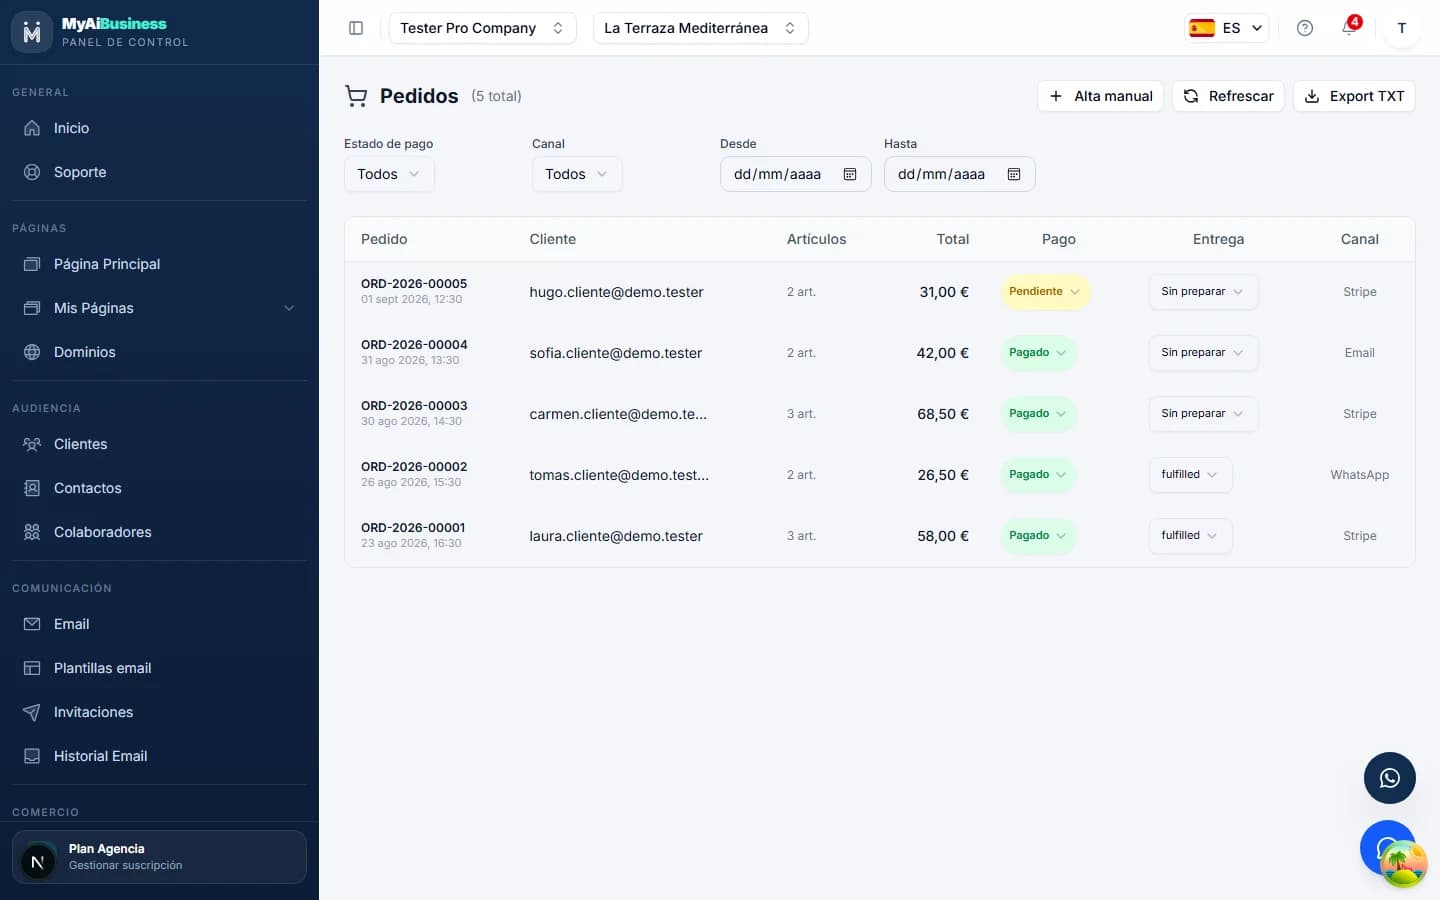
Under “Commerce” → “Orders”, find the order: payment status, channel and delivery.
Change “Not prepared” to delivered from the dropdown when you serve it. Filter by status, channel and dates.
Use “Manual entry” to record an order taken by phone and “Export TXT” to get the list.
Every paid order deducts stock and sends a confirmation email to the customer.
How you know it worked
An order in “Paid” state in the Orders panel.
Tip: PayPal, Bizum and bank transfer appear as “coming soon” under Payment methods: today the channels are WhatsApp, email and card.
Name the template, set subject, button text and link, logo and image, then click “Save template”.
Check the preview on phone, tablet and desktop. “Send test email” sends it to yourself.
In “Invitations”, select the event and tick recipients: event attendees and address-book contacts, or “Select all”.
The search box filters by name or email.
Click “Next: Customise email”, pick your saved template and click “Send a test to my email”.
Check the real email before the big send: subject, variables and button.
Click “Send to N people”.
Sending goes in batches and respects your plan’s daily limit. Every email carries an unsubscribe link.
Open “Email history”: filter by sent, failed or pending and by date, and export if you need to.
Each email shows type, recipient, status and provider.
How you know it worked
Invitation received in your inbox and logged in Email history.
Tip: One template per type of communication (invitation, reminder, thank you) saves you redoing the design for every event.
The envelope on the card opens that event’s invitations in one click.
Attendees also receive their confirmation email automatically when they sign up.
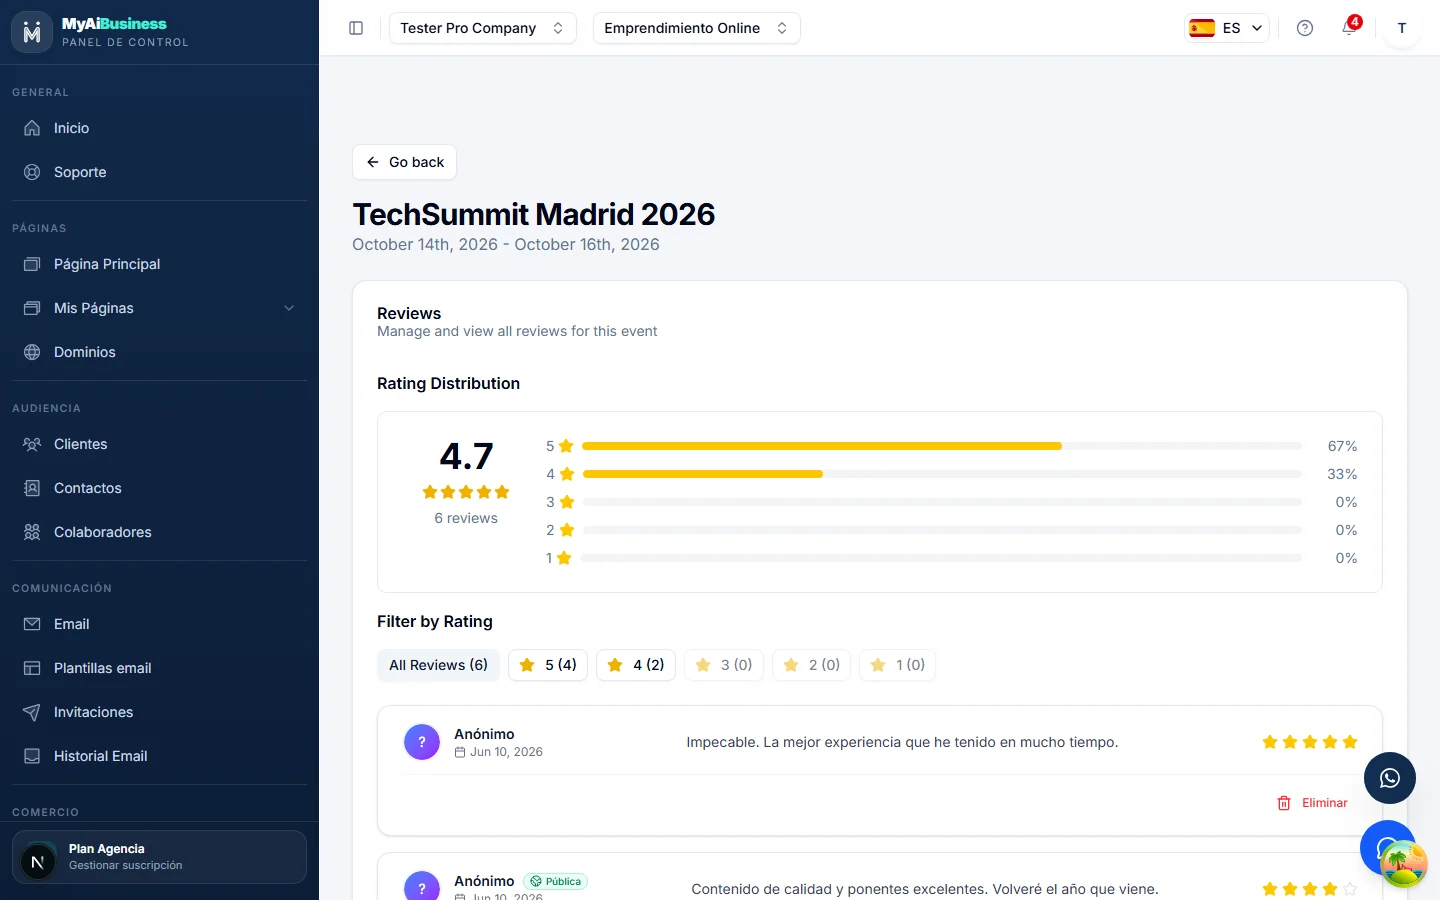
On the card, click the number next to the star to open the event’s reviews.
You will see the average, the distribution by stars and each review with its comment.
Turn on “Public” for the reviews you want to show; “Delete” hides one without erasing it completely.
Only internal reviews (1 to 4 stars) go through your dashboard; 5-star reviews are redirected to Google or Trustpilot.
On the event page, click a star to see the customer’s flow.
1 to 4 stars opens an internal form; 5 stars sends to your external links. After the event, the platform automatically emails a review request and a reminder five days later.
How you know it worked
Reminder sent to confirmed guests and one review marked as public in the dashboard.
Tip: The “Real reviews” block in the Builder shows your public reviews on your site, as a grid or carousel.
Open “My files”: all your images by type (logo, banner, carousel, gallery, hero, QR…), with search and “Recent” or “Heaviest” ordering.
The “In use” label marks the ones that appear on some page.
Click “Select unused” to mark the ones nobody uses and delete them in bulk.
Their three sizes are removed from storage. Files in use cannot be deleted by mistake.
Upload your large images without cropping: they are optimised automatically.
The storage counter updates instantly.
How you know it worked
The “Your plan” card with up-to-date counters and space freed in My files.
Tip: Before a big event, check the “Your plan” card: if you are close to the attendee or email limit, change plan in advance.
Click “Send” (or Ctrl+Enter).
The ticket appears under “My tickets” with its number and status.
Reply from the ticket thread or by answering the notification email.
The notification bell alerts you to every reply. A resolved ticket closes by itself after seven days; you can reopen it.
If you cannot log in, use the public support page with the FAQ and the guest form.
It will ask you to confirm your email before opening the ticket.
How you know it worked
A ticket created under “My tickets” and the reply received by email and in the dashboard.
Tip: The “?” button inside the Builder opens support with the page you are editing already attached: use it when the problem is about a specific page.